Convert Shower To Tub Shower Combo

Pros and Cons for Acrylic Tub to Shower ConversionI have a 36"x36" standing shower stall that has a cracked shower pan floor. Can that be fixed ? OK - terminology issue here. The "shower pan" is a collection liner than underlies the shower floor itself, and is designed (if built and plumbed right) to trap any leakage from the shower floor and route it to the same floor drain pipe. Example image here, copper in this case - It sounds like your are saying the shower floor or base unit failed - likely a fiberglass or plastic shower, which commonly fail due to incomplete support under them. This can be repaired if fiberglass, but is not usually done unless just microcracking, as it is hard to find an expert - usually you have to have a car body fiberglass specialist or a surfboard repair expert do it, and the color will not match perfectly unless you get a new gelcoat over the entire base unit. Cost about $300-500, ASSUMING the material can be repaired - true fiberglass can, thermoplastic can sometimes be welded but anyone's guess how long it will last without cracking again, plastics like PVC can rarely be fixed so they will hold someone standing on them.

Any sort of repair is likely to crack again, because you have done nothing to remove the cause of the cracking which is standing on a base that is not fully supported over its full extent. Some cheepo or desperate plumbers try injecting non-pressuring type expanding foam underneath to improve the support - this does a great job of supporting it but unfortunately supports mold, so starts stinking in short order as a rule. The normal fix is to remove and replace it, because once it is out there is no sense in putting a damaged one back in for the small increment in cost.
Striped CurtainsRemoving it means taking the shower wall liners or the bottom row or two of tile out so you can get the new base unit into place (because they overlap it), then replacing them.
Move Ac Unit To RoofSo, the $3000 range indicated is indicative of this type of job, which typically runs from a very low of around $1500-2000 for an identical base unit, to more typically $3-5,000 depending on whether a shower enclosure or tile walls.
Sell Old Laptop Toronto
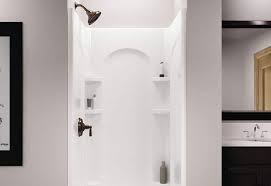
Of course,when the new one is put in, it is CRITICAL that it be fully supported - this means rubbing plumbers rouge or similar marking substance on the bottom, test fitting it, and then lifting it out and checking that all the stiffener ribs and support pads made contact with the pan, and making adjusments as necessary until it has full contact, then standing in it and rocking back and forth to check for any points not making full contat and fixing them. The $10,000 plus numbers you got must have been for entire shower replacement down to the joists and studs, and the $30,000 range number would be typical for a full bathroom remodel with new shower or shower/tub and doors and surround, wall finishes, vanity, sink, toilet, and flooring and door. Grimy grout and outdated colors reminiscent of decades past are staples of a bathroom in need of a makeover. Giving your bathroom the fresh new look and feel you envision could be as simple as a bath to shower conversion! Unlike traditionally expensive, time-consuming remodels, Bath Planet can get your new bathroom ready to use in as little as a day!

Bathtub to shower conversion is popular for many households. Whether you are looking for a safer alternative to climbing over tall bathtub walls or simply want to create a more sophisticated style in your bathroom, our professionals can offer you the remodel you desire. For just a fraction of the price, our showers can be installed in a variety of styles and colors to best suit your taste. Convert Bath to Shower All of our showers are engineered to withstand the test of time, resisting chipping, cracking, and mold and mildew growth. Our acrylic shower systems are designed to be as low-maintenance as possible, so that tough scrubbing is a thing of the past. Our process also eliminates the need for lengthy, stressful construction projects. After we take measurements and photos of your existing bathroom, our team designs a new shower that maximizes your space. With so many options, it’s easy to create the bathroom that you’ve been dreaming of! Give us a call to speak with one of our helpful representatives about how we can ‘magically’ transform your bathroom.
Contact us to schedule your FREE bathroom remodeling consultation today! Shower and Tub Door Install Freshen up your shower or tub with a new door.Our professionals will install to your satisfaction. or at your local Lowe's store. Work with a Lowe's sales associate to plan your install project and select the right shower or tub door for your home and budget. 2 Get Started An installer will contact you to schedule an in-home measure and project assessment. Once complete, you'll be provided an inclusive quote. Purchase your products and installation services together, and an installer will contact you to schedule your installation. 3 Get Finished Sit back while Lowe's professional installers perform the work in a timely manner. 20% off Additional Basic Bath Installations Buy any basic bath fixture installation service and get 20% off each additional installation of equal or lesser value. All services are guaranteed by Lowe's warranty. Offer includes bath faucets, toilets, bath sinks and pedestal sinks.

Additional charges may apply. Discount taken at time of purchase. Find a Store Satisfied Customers Our tub and shower door installation services received the highest customer satisfaction ratings on 93% of the thousands of installation customers surveyed. Bath Design Tips Get inspired to update your bath with tips and trends from the 2012 Bath Book. Explore the Bath Book Lowe's Shower and Tub Door Install Find shower and tub doors, shower units and handheld showerheads for your home at Lowe's. Use a Lowe's professional installer to ensure a smooth install for your next shower project.I've long wanted to replace our bulky old shower doors with a curtain in our home's one-and-only family bathroom. This shower sees a lot of action, from our daily showers to my son's baths. A curtain eliminates that bottom rail, making it much easier to give baths. And left open when not in use, the room now expands larger than before. I was daunted by the idea of dealing with holes in the wall (and possibly the tub!), but I'm so glad I took the plunge:

Caulk remover (I used Motsenbockers Lift Off gel) Shower curtain (a liner at minimum, plus outer decorative curtain if you like) Plastic scraper or an old credit card 1. Remove the shower doors from the track. Mine lifted up and out from a top track. The doors can be heavy, so get help on this part if you need it. 2. Remove all screws from the shower door frame. My frame had three screws on each side and zero in the bottom track (jackpot!). There actually was one small screw in the bottom track that was the reason I put off removing the doors for so long (in fear of leaving a hole in the bathtub), but it turned out to just be a set screw for the guide on the track. So, if that's holding you back, do a little investigative work to determine whether the screw actually penetrates the tub body. 3. Carefully cut any caulked joints between the frame and the walls/ tub. Be sure to hold the knife parallel to the wall and tub, not perpendicular. You don't want to leave cuts in the wall and tub surfaces, you just want to separate the frame from the wall.

4. Pop off the top track. Mine was not attached to the rest of the frame at all, it was only sitting in place on top of the side frames. A simple jolt with the palm of my hand loosened it and it lifted out easily. 5. Remove the side frames. Have your utility knife handy in case you need to cut a little more caulk as you pull the frames from the walls. There will be caulk left behind on the tile - don't worry. 6. Remove the bottom rail from the tub. Prepare yourself - this is going to yucky! But this moment is also liberating; seeing your tub free of cumbersome metal frames. Think of it as having braces removed! 7. Scrape any caulk you can from the tub and the wall tiles. This is where an old credit card can come in handy - I found it most effective in scraping up the discolored caulking left behind once the door frames were removed. You likely won't get all of the caulk removed in this step, but that's okay! Just get as much as you can without damaging any surfaces.

8. Use caulk remover according to packaging directions on any stubborn spots. I applied a gel to the strips stuck on the tub, let it sit a few minutes, then scraped again with the plastic card. (As a side note, I skipped this step on the wall tiles, as my tiles are unfortunately painted. So, the caulk peeled right off of my walls, along with strips of paint, revealing pink tiles beneath the paint. Because of this, I left strips of caulk on the walls in some places, as I plan to replace the tile down the road. In the meantime, I will likely peel off the rest of caulk and touch up the tile paint, but this wasn't done as a part of this project.) Also, our tub surface beneath the old track is pretty rough, but any discoloration came off with this step. There are still pocks in the surface, but I far prefer them to the constantly-dirty old shower door frame! 9. Fill the screw holes in the walls. This can be done in a few ways: with special plugs inserted into the holes, or with silicone caulk matching your tile.