Curtains For Sliding Glass Doors Pictures
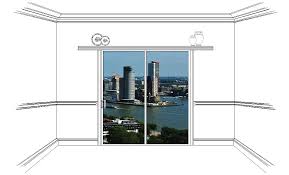
Caribbean and Plantation Shutters are perfect for glass sliding doors. Shutters provide privacy when needed or partial light through the louvers or total light when the shutters are rolled back off of the doors. Rolling shutters are suspended overhead on an easy-glide aluminum track that is installed on the wall over the doors. The carriers are nylon wheels that do not jam or skip but allow perfectly smooth function of the shutters. With adequate wall space the shutters can roll off to either side of the door revealing the full view and maximum available light. The shutters do not bi-fold like closet doors but rather roll back on the track, parallel to the wall taking very little space in front of the doors. The diagram shows a detail of the track and how the shutters install on the glass sliding door, but do not hesitate to give us a call before measuring. We can walk through the steps for measuring and the installation by phone. Your shutters will be painted or stained the color you specify.

They will arrive with all necessary hardware and a diagram for installation. Installation can be done by any husband or handyman carpenter with ease. Tools required: Measuring tape, screw gun and spirit level. Perhaps also a venti Starbucks. Of course we are glad to offer installation support by phone and the best customer service you have ever had. Cotton Fire Truck Window Valance Newport Grommet Window Curtain Valance Window TreatmentsEnsure privacy, protect your home and furnishings from sun damage and block out light for a restful night’s sleep with good quality room darkening window shades — our selection includes cordless, pleated, honeycomb cellular, layered and Roman shades along with many other popular styles. Today’s modern window treatments are attractive, affordable and easy to install — use them to enhance the beauty and improve the value of your home. A new set of window panels, a dramatic window shade curtain or an attractive window valance is an easy way to update your home décor and enjoy additional benefits such as odor neutralization, UV ray protection and window insulation.

Use curtains to accent positive architectural features, conceal unattractive areas, block unsightly views, provide privacy and security, prevent sun damage, reduce glare and eliminate unwanted light.ENVIRONMENTAL PERFORMANCESearch, evaluate and document our products against leading green building rating systems. Do you have a door problem at your house?
Car Seat Rental Long IslandYou know, the kind of issue where you have a tiny space and opening a door into (or out of) that small area makes for some awkward maneuvering?
Patio Furniture From Recycled PlasticI love that we have an attached bathroom in our bedroom, but it's a pretty small area to walk into and having the door swing into the already tiny space was frustrating from day one of living there.
Toilet Paper Holder Too Small
My Mom suggested when we moved in that I fix the problem with a sliding door of some sort, but I didn't really know how that would look. And it sounded expensive on top of all the other renovations we wanted to do. I continued to be annoyed with the door situation until I saw the sliding barn door that we had installed at the studio to fix a similar problem. The issue with that door was that it actually swung outwards and stuck out into the living room when it was open (as you can see in the above before and after pictures). A door that would slide instead of swinging made much more sense and wouldn't take up any space in the teeny-tiny bathroom or kitchen. When I saw that the problem at the studio was instantly fixed with a new door configuration, I knew it would be the perfect set up to fix my door issue as well. Now, another door solution for small spaces is a pocket door, but they slide inside the wall rather than on top of the wall. So they are much more expensive because you need a contractor to open up the wall and install them.

I wanted to use the hardware that we used on the studio door, but I also needed an actual door to hang on the hardware (duh!). The simple ones I liked were about $400. So I recruited Josh to build a door I designed with a vertical and horizontal stripe pattern, and of course, he nailed it and built it for much less! Tell us your door secrets, Josh!The real secret to building this door is that it's so easy and inexpensive to make. A door that looks similar can cost up to 800-1000 bucks (I stress looks because some material is just inherently more expensive.) This door cost about $80! Supplies:- about 9 1" x 4" x 8' pine boards- 1 4' x 8' medium grade plywood sheet (I used an oak ply) - wood filler - paint Here are the tools I used:- table saw- miter saw- circular saw- tape measure- nailer- straight edge- sandpaper- painter's tape The first thing we did was make a plan, which is a good place to start. Laura's doorway was pretty narrow, so the door ended up only being 29" wide and 93" high.

The door was just wide enough to cover both sides of molding when closed (by design.) Don't forget you can modify to fit your opening and space! After we came up with the plan, it was time to cut some wood (or make some sawdust, as I've heard old timers refer to woodworking). I cut the plywood down to the size we needed (29" x 93"). In order to get the amount of planks onto the size we needed, I had to rip them to 3 1/4" wide. After everything was ripped, I cut them to the length needed, then sanded them. After everything was cut and the edges were sanded, I laid all the planks on the plywood to make sure everything fit right. Then it was just a matter of gluing and nailing everything into place. I started with the horizontal planks. Then moved on down to the verticals, making sure to push the pieces firmly next to each other. I used 1.25" 18 gauge galvanized nails. After everything was glued and nailed down, I filled all the nail holes and any other imperfections in the wood.
Once the filler was dry, I hit the entire thing with 120 grit sandpaper, and then moved up to 220. Since I was painting the door, I wanted to make the surface as free of defects as possible...almost so you couldn't tell it was made from wood. To install the door handle, I drilled a couple of holes from the back side of the door, inserted the screws through to the front, attached the screws to the handle, and then filled in those screw holes with wood filler. At this point, all that was left to do was to tape and paint. I used painter's tape with edge lock technology. It costs a few bucks more, but you can tell the difference! I taped all of the edges super tight, and then applied 3 coats of each color, lightly sanding between each coat. And that is it! The whole thing took about a day to make. The longest step was painting. To install the door onto the wall, we just followed the instructions that came with the hardware. This process will be different depending on which hardware you go with, so make sure to choose hardware that has an installation process you are comfortable with (or you can always have a professional install that part and just concentrate on your door).