Diy Outdoor Bench Cushion No Sew

Hope your weekend was great – I was SO sick most of it which was a bummer. I get a horrible cold every year this time of year and I think they’re getting worse as I get older. This one was a doozy. I felt a little better in the evenings and like a new person last night, so I got this project done during those times I wasn’t on the couch. I’ve been working on our mud room a lot this year and I’m loving it. It’s different for me – lately I’m going for lighter, more subdued colors on the walls, but this room is FULL of color. I like to start with some sort of inspiration for each space and this one was based off a rug I found at HomeGoods: I picked the blue color on the beadboard from this rug (Reflecting Pool by Ralph Lauren). I LOVE all of these colors and love them together. These thin rugs come in so many fun designs (I’ve seen quite a few of them at HG) but I don’t actually use them as a rug just because of how thin they are. Even with a rug pad they don’t stay put for me and I end up tripping all over them.

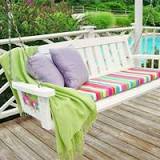
So I had a plan all along to use this one in a different way – as an upholstered cushion for the bench. If you’re really good you know how to make a real cushion, but I do it the cheater way. I’ve done this a few times and it always works well. I grabbed some scrap mdf from the garage and cut it down a little smaller than the rug – it was already about 19 inches wide and I cut it down to 42 inches. Instead of using expensive, thick foam from the craft store, I used my egg crate foam that you use on the bed: I showed you how I use this on my upholstered headboards here too. In the fall the twin foam pads will go on clearance and you can get them for super cheap. WAY cheaper than thick foam from the store. I used hot glue to secure it to the wood, then used an electric meat knife to trim it down: I think I saw that idea like ten years ago on Trading Spaces and it works GREAT. I put another layer on top, this time with the textured part facing down: You can see I had to piece it together – since the rug is so thick you don’t even see where they were put together when it’s all done.
To make it nice and smooth I wrapped the whole thing with scrap muslin that I had: You don’t want to pull too tight because the edges won’t be even. If you pull it crazy tight you’ll have bumps in between where you stapled on the back. I did the same with the rug and made sure to center it right on top: I did the two short ends first, then the sides, then the corners last.
Auto Repair Rss FeedI knew the corners would be tough with this because it’s so thick.
Wooden Toilet Paper Holder PlansI had to cut a lot of the corners down under there so it’s not pretty – but nobody will see it.
Ac Unit Decorative CoversIt’s secure and staying put and that’s all that matters. It turned out just as I saw it in my head all those months ago: It doesn’t go the whole length of the bench and I knew that going in – I wanted some of the bench to be open so we can set stuff down if needed.

I don’t know if we’ll keep the cushion off to the side or in the middle, but for now I’ve got it here: No, the door trim is still not painted. I’m getting myself amped up to do it. The aqua pillow was one I found at World Market a few months ago and the other one is an outdoor pillow that used to be up in the loft. That one probably won’t stay but the colors are perfect match too: Now that I see this aqua with that blue I want the door to go more that direction. Now it’s just a light blue I had in my paint stash. I think a slightly more aqua color would be fun. Who knows – I’ll decide when I get the trim painted white. I’ve mentioned before how AWESOME it has been to have this space finished now – it’s such a night and day difference from the mess that used to be here. The coats are not hanging now because I’ve hung them in the closet. We only need them for three more days this week and then I think spring will actually be here. I refuse to look at them anymore so they’re out of sight: I thought I knew what I wanted to do on that big wall above the bench but when we tried it out it looked goofy.

So I’ve come up with a new plan for all that wall space that I hope to work on soon: Stay tuned for more on that. Other than that and the door trim I still want to install a new light fixture (we have a long fluorescent light in there now), perhaps add some additional lights (I need to see if my idea will work) and install crown molding. And then figure out what to put on the walls to add more of “us” to this room. I’m so happy with how it’s coming together so far! Have you ever used a rug for something unexpected like this? Can you sew a cushion or have you tried a DIY version like this?If you're planning to entertain this hot summer weekend and the thought of guests sitting on your bare garden bench makes you feel very un-Martha-like, don't panic. Honestly, you can whip up this NO SEW fold and glue garden cushion in about 45 minutes to adorn your charming garden. fabric remnant to fit bench two pieces of ribbon approximately 40 inches each, folded in two Fabric Tac glue or my new favorite Liquid Nails Home Project glue

batting for the inside cushion (not shown) 1. Place fabric on bench. Fold fabric over and chalk your cut line 2. Cut off the extra fabric 3. Open out fabric with right side up. Mark where the ribbons will be glued on. Fold two 40" ribbons in two with the fold of the ribbon even with the back edge of the fabric, glue ribbons in place. 4. The fabric will be ready to glue together when it is laying flat, the two ribbon ties are glued in place and the right side of the fabric will fold over the left to form the cushion cover after the glue is run around the edge of the fabric. Be sure to leave about 12" unglued in the center of the back to stuff the cushion. When you are gluing the two edges together, the fabric will be wrong side out. 5. Press the two edges together using some sort of straight edge, here I'm using a ruler 6. With a hot iron, press glued edges to form a strong bond. 7. Turn right side out and cut batting to place inside the cushion cover.