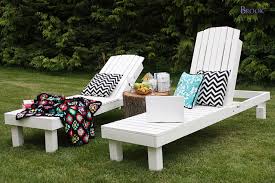
Diy Patio Lounge Chairs

Reader Showcase // Two Toned Chaise Lounge for FFA Fair Reader Showcase: Dan's Chesapeake Lounger5 – 2x4 @ 8 feet long 8 – 1x3 @ 8 feet long 2 – ¼” bolts 4” long with nuts and 6 washers 2” exterior screws or nails and glue to nail slats down with Please read through the entire plan and all comments before beginning this project. It is also advisable to review the Getting Started Section. Take all necessary precautions to build safely and smartly. Work on a clean level surface, free of imperfections or debris. Always use straight boards. Check for square after each step. Always predrill holes before attaching with screws. Use glue with finish nails for a stronger hold. Wipe excess glue off bare wood for stained projects, as dried glue will not take stain. Be safe, have fun, and ask for help if you need it. 2 – 2x4 @ 85” 2 – 2x4 @ 21” 16 – 1x3 @ 24” 6 – 2x4 @ 14” 2 – 2x4 @ 7” 2 – 2x4 @ 32” 3 – 2x4 @ 17 ½”

7 – 1x3 @ 37 ½”
Flat Track Tires For Sale 1 – 2x4 @ 24” (stop block)
Cheap Allure Wedding Dresses Build your frames first.
Buy Puma Suede ShoesYou can use 1 1/2" PHs and 2 1/2" PH screws OR 3" countersunk screws. I highly recommend the PHs because it will hide your screws holes, making it easier to paint the pieces, and then attach later through the PHs. Next add your slats. You can also attach slats from underneath with PHs if desired. Attach legs, and then to front, attach second row of legs. Use 2 1/2" screws and glue here. These legs are just long enough to provide you a spot to put the stop block when chaise is fully reclined. Now build your back - recommending 1 1/2" PHs and 2 1/2" PH screws again here.

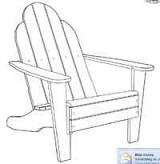
Add the back slats. Now we attach back to chaise with the pivot bolt .... Brook is also sharing with us her step by step finishing tutorial here to get this amazing finish! And the missing diagram for the stop block - thanks Brook for the heads up and Mark.Over 100 Free Outdoor Woodcraft Plans at AllCrafts.net Free plans for all kinds of outdoor woodworking projects. Arbors, chairs, patio furniture, benches, gardening tables, outdoor storage and much more! DIY Pallet Wood Hose Holder with Planter Adirondack Lawn Chair and Table Build a Wood Folding Sling Chair Bench and Planter Modules Build a Custom Tree Bench build a peaked top arbor Build a Porch Swing Build a Tough Toolbox Build an elegant patio set Build the Perfect Picnic Table Building a Bench Planter Cedar Chaise Lounge Plans Cedar Garden Bench Plans Cedar Patio Chair Plans Cedar Patio Table Plans DIY Outdoor Lawn Furniture DIY Pallet Art Projects
Easy Chair Project Plan Factory Cart Coffee Table Folding Double Adirondack Chair Plans Free Porch Swing Plan Garden Bench Project Plan Garden Closet Storage Project How to Build a Garden Arbor How to Build a Picnic Table How to Build a Planter How to Build a Planter Bench How to Build a Sandbox How to build a simple garden bench or seat How to Build a Wood Arbor for Garden or Yard How to build an Arched Garden Bridge How to Make an Adirondack Chair and Love Seat I Love Old Windows Inspiring Pallet Gardening Ideas Make a Bamboo Wind Chime Make Your Own Arbor Modern Outdoor Bench Project Plan Natural Non-Toxic Wood Stain with Coffee, Berries and More Play Washers - Build a Set of Washer Boxes Porch Glider Project Plan Power Sculpted Contemplation Bench Provence Beam Dining and Benches Simple DIY recycling center Simple Stackable Outdoor Chairs Simple White Outdoor Sofa

Workbench for the Gardener We respect your email privacy Over 50 Free Bird House and Bird Feeder Woodcraft Plans Over 100 Free Wooden Toy Woodcraft Over 50 Free Workbench Woodcraft Plans Over 100 Free Outdoor Woodcraft Plans Over 150 Free Plus Size Crochet Patterns Free Doll Making Projects and Doll Patterns Over 50 Free Spongebob Crafts Over 100 Free Baby Knitting Patterns Plastic Canvas Projects & Free Patterns Over 100 Free Crocheted Flowers Patterns Over 200 Free Knitted Sweaters and Cardigans Over 100 Free Crocheted Baby Hat Patterns Over 200 Free Crocheted Afghan Patterns Over 250 Free Crocheted Square Patterns Over 100 Free Stuffed Animal Sewing Patterns Over 300 Free Tatting Patterns and Projects Over 100 Free Wooden Toy Woodcraft Plans Over 75 Free Paper Flower Patterns and Tutorials Type 2 Diabetes Medical Alert Necklace Items will not appear in the cart unless you add them.

The savings will be automatically be deducted from your order total. If you need more help on using Amazon promo codes...Click Here to review their directions.This step by step diy woodworking project is about chaise lounge chair plans. If you want to add character to your patio or deck, a lounge chair is perfect, as it is a straight forward project that doesn’t require a large investment. Choose the chair design that fits your needs and tastes, before buying quality materials for the job. Cedar, redwood or pine are great choices, as these components would look great and be highly durable. You should also remember that you could adjust the size of the wooden chaise lounge chair, in order to suit your needs and tastes. Nevertheless, you should still use the same woodworking techniques described in this project, even if the components would have other dimensions. Sand the edges of the components with a sand-block and 120-grit sandpaper, or round them with a router and a 1/4” bit.

Pre-drill the wooden components before inserting the screws, to prevent the wood from splitting. Sand the lateral edges of the backrest or make it 1/4” narrower, in order to fit properly inside the frame. A – 4 pieces of 2×4 lumber 6” long LEGS B – 2 pieces of 1×4 lumber 76 1/2” long SIDES C – 3 pieces of 1×2 lumber 22 1/2” long SUPPORTS D – 2 pieces of 1×1 lumber 56 1/2” long SEAT CLEATS E – 19 pieces of 1×3 lumber 22 1/2” long SEAT SLATS F – 2 pieces of 1×2 lumber 18 1/2”, 2 pieces of 1×1 lumber 21”, 8 pieces of 1×3 lumber 21” BACKREST G – 2 pieces of 1×2 lumber 14 1/2” long, 4 pieces of 1×2 lumber 2 1/2” long BACKREST CLEATS H – 2 pieces of 1×1 lumber 6 1/2” long, 1 piece of lumber 19 1/2” PROP UP 1 piece of 2×4 lumber – 6′ 2 pieces of 1×4 lumber – 8′ 7 pieces of 1×3 lumber – 8′ 2 pieces of 1×2 lumber – 8′ 2 pieces of 1×1 lumber – 8′
Hammer, Tape measure, Framing square Miter saw, Drill machinery, Screwdriver, Sander Safety Gloves, Safety Glasses A wooden chaise lounge is a great example of a diy project that doesn’t require a large investment, but change dramatically the look of any patio or deck. There are many designs and shapes you could choose from, but in this article we show you plans for a simple lounge chair, that can be built in just a weekend. Top Tip: Adjust the size of the chair to your needs, but use the same carpentry techniques described in this guide. Add wood glue to the joint, in order to enhance the bond. Build the legs for the lounge chair from 2×4 lumber. As you can easily notice in the diagram, you need to make a 3/4″ deep notch to the top of the legs. Make multiple parallel cuts and remove the excess with a chisel. Smooth the recess with sandpaper. First, build the frame of the chaise lounge chair. Therefore, build the sides from 1×4 lumber, the legs from 2×4 lumber and the supports from 1×2 lumber.

In order to secure the legs to the frame, you should notch the top part with a circular saw. Top Tip: Drill pilot holes trough the sides, countersink them and drive in 2 1/2” screws in the supports. Work on a level surface, making sure the corners are right-angled. The next step of the project is to attach the seat slats. In order to install the 1×3 boards into place, we recommend you to fit the 1×1 cleat first. Level the cleats using a hand level, drill pilot holes and insert 1 1/4” wood screws. Afterwards, you should cut the 1×3 slats at the right size and secure them into place with 1 1/4” screws. Place the slats equally spaced, leaving about 1/2” between them. Don’t forget to countersink the head of the screws. Afterwards, you should install the cleats for the prop up, as in the free plans. First, install the bottom cleat, made of 1×2 lumber, using 2” screws. Secure the cleat to the frame of the lounge chair, as well as to front the legs. Top Tip: Next, you should install the 1×2 pieces to the bottom cleat, as in the image.

Place the pieces every 2”, using 1 1/4” screws and glue. Make sure the cleats are level, using a spirit level. Continue the project by building the backrest, from 1×2 lumber and 1×3 slats. First of all, you should build the frame of the backrest, in the following manner: the sides of the frame should be made of 1×2 lumber, while the bottom and top components from 1×1 lumber. Top Tip: Secure the slats with 1 1/4” pocket screws or drill pilot holes trough the frame and insert 2” in the 1×3 boards. Place the slats equally spaced, leaving between them about 1/2”. Afterwards, build the prop up from 1×1 lumber. As you an see in the image, you should round the top ends of the side braces, in order to flip properly. Assemble the components together with 2” screws, after drilling pilot holes in the lumber. Drill pilot holes in the frame of the backrest, as well in the prop up. Next, install the prop up into place with 2” carriage bolts. Place a washer between the frame and the prop-up.

After building the backrest, as well as the prop-up you should fit it into place and lock it with one carriage bolt on both sides. In order to get the job done in a professional manner, you should make sure the backrest is horizontal, when drilling the pilot holes. Fit a washer between the frame and the backrest. Top Tip: Drill pilot holes both trough the frame of the lounge chair and trough the back rest. Insert the bolts and tighten the nuts properly, making sure you don’t damage the lumber. I personally love this design, as it is both simple and elegant. The straight lines create harmony and enhance the look of any deck or patio. After building the lounge chair, you should fill the heads of the screws with wood putty. Leave the compound to dry out for several hours, before sanding the wooden surface with a sander (use 120- sander), along the wood grain. To Tip: If you will place the chair in the garden, you have to apply several coats of wood stain, in order to protect it from rot.