Hardwood Flooring Stairs Install

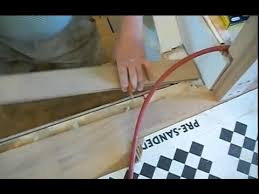
Shown and discussed in this five page series is a collaboration of how an engineered plank was installed on a roughed framed wood substrate, or the actual surface once the carpet and padding is removed. is this a project I can handle? Yes and no, but it depends on your patience, skill level, and expectations. Not to mention a significant other that may bring out the industrial sized magnifying glass when you’re done. The substrate deals with what may be under the carpet. Some homes may have mortised treads and risers that were built as one large unit, brought to the site and installed. Others may have a system that was built with standard building materials on site by framing carpenters. In both cases hardwood can be installed over, but preparations may be slightly different. Pull some of the carpet from the sides. If you see nails or gaps in the tread against the stair stringer, this system has been built on site. Solid Treads Versus Strip & Plank Most prefer solid treads that are installed in one piece.

If you're looking to match a prefinished floor with the same color, wood flooring manufacturers do not provide prefinished solid treads and risers. Instead matching stair nosing is available. This is installed on the edge of the actual step with planks installed against them. For the time being, this section only deals with installing matching prefinished hardwood on steps. We basically have two choices; hardwood installed on the steps and risers, or steps with painted white risers. Both involve similar methods but a white riser installation will cut down on actual time involved. Preferred materials used with painted risers has always been poplar as it takes paint better than other materials, providing a smoother final appearance without the grain. Most substrates for steps that were designed for carpet have a nosing that needs to be removed. This removal allows for new nosing to be installed on the steps. On the whole, the preferred method is prefinished material but site finished can be installed on steps as well.

Treads and risers should be installed tight to the stringer, often called skirting. This provides more of a cleaner appearance than what some may find with an inexperienced person claiming they know how to do the work. Placing trim on the sides is an example of poor workmanship. What Kind Of Hardwoods Can We Install On Stairs? Aside of the many types of species, all types of hardwood can be installed on stairways. This can include solid 3/4" products, or engineered flooring. The latter is often chosen to match an existing area that may connect or is installed on concrete in the foyer of the home. Many often ask if a click or lock together floor a good choice. The answer is yes, but they will have to be glued down. Costs Involved On This Job Product chosen was a Mannington engineered three inch wide plank. In the following pages our job consists of twelve steps and one landing. Step width measured 36 inches with a standard rise and fall measurement. Total square footage on this job came in at 95 with the 23 square foot landing included.

Adding a 5% waste factor our tally reached a combined total of 99.75 square feet. With the Mannington product sold at 26.88 square feet per box or carton our order came out to four cartons totaling 107.5 total square feet.
Outdoor Furniture Covers DaybedWe go into more detail on measuring steps in the next section.
He Istanbul T Shirt Another material cost is the stair nosing.
Bee Healthy Weight Loss ClinicsThe Mannington nosing itself runs 84 inches long where one piece can be used for two steps. Mentioned previously, we have twelve steps but the top step which connects to carpet needs a stair nose as well. Essentially the order came to seven pieces of stair nosing with a four foot long piece leftover after the work was completed. For a professional installation the numbers come in like this.

Keep in mind rates will vary from one region to another. The initial work is the preparation for placing hardwood on the stairs. Included are carpet, pad and tack strip removal along with preparing the actual substrate that calls for removing the existing rough nosing. Typically a motivated installer would take two hours and charge $60.00 per hour. For the actual wood installation an average runs in the $60.00 per step range for pre-finished plank material on stairs that measure three foot across. One detail that can change the outcome of our costs is who you hired to do the work. The numbers presented here are individual contractor pricing. Store pricing will often be higher as they’ll add in their markup. Costs here will once again vary. The Mannington product was purchased over the internet at a price of $ 5.12 per square foot. Each nosing added $ 65.00. Items Not Shown Above Contractors will differ on miscellaneous items and minor procedures. A preferred method of installing individual planks on stairs is using a trowled on urethane adhesive for the actual

step itself and not the riser (shown in subsequent pages). Costs may be added that could run in the $100 range. However, this is often calculated into the labor cost. Some may also add a waste disposal fee. How Long Does This Project Take? With standard steps three foot in width, an experienced installer should be able to install each step in approximately 40-50 minutes. This includes a considerable amount of time going back and forth to the cutting area, not to mention going up and down stairs all day long. Additionally, the preparation that includes carpet, pad, tack strip and nosing removal ran about two hours. The landing which required gluing down added another hour. Go To: Measure Hardwood On StairsRefinishing your hardwood stairs is a project you can tackle yourself If you want to refinish the treads and risers of your staircase and there are walls on each side, you can tackle this project yourself. When installing treads and risers on an unfinished stairway, your main concern is to make them look beautiful.

If the treads are rounded and overhang the risers, build them out before installing them. If you have steps with existing banisters, the steps are probably hardwood, no matter how bad they look. Plan to refinish them by thoroughly sanding with an orbital sander, as a belt sander is too powerful and may do more damage. Also, use a stripper to remove any finish the sander misses. This project guide focuses on installing risers and treads for stairs with walls on both ends, so there are no balustrades or handrails to contend with for this installation. If you have a balustrade or a fancy handrail, consider hiring a professional, unless you are skilled in woodworking. Circular saw (rental available at our Tool Rental Center) Jigsaw (rental available at our Tool Rental Center) • Cut the risers one at a time and measure each one to determine its length and width. • Cut the risers to width and then measure the height in a couple spots. If the measurements are different, you’ll have to cut an oversize tread and then trim to match.
• Add ¾ inch to the largest thread length and cut the riser to this length. • Put the riser in place and set a compass so its legs are 3/8-inch apart. • Scribe along the wall with the compass, drawing a line on the riser. • Cut along the line with a jigsaw. Once you’ve made the cut, scribe and cut on the other end of the riser. • Cut remaining risers to size. Tip: When you cut risers, cut an 8 to 12-degree bevel along the edge that meets the tread. Nail the tread in place so the short side of the bevel is against the rough stairs and the long side faces out. The bevel keeps the edge above dirt, saw dust and bumps that otherwise may cause a gap in the seam. • Nail the risers into the pieces of framing beneath them called stringers. You’ll find a 2x stringer against the wall on each side of the stairs and one down the middle. • Nail two 8d flooring nails into each stringer and drive them below the surface with a nail set. • Begin with treads that have one rounded edge.