How To Fix Peeling Paint In Bathtub
1-qt. White Tub and Tile Refinishing Kit Refinish tub, tile or sinks in less than 1 day with epoxy paint Creates the look and feel of a porcelain tub Durable coating retains color and sticks in high moisture areas Rust-Oleum 1-qt. White Tub and Tile Refinishing Kit is a two-part epoxy acrylic designed to rejuvenate ceramic and porcelain surfaces like tubs, sinks and showers in just minutes. Specially formulated to provide excellent adhesion, durability and color retention in high moisture areas. It applies a smooth, porcelain-like finish that resists mildew growth for long-lasting protection and beauty. Apply to ceramic, porcelain or fiberglass tubs, sinks and tiles Durable and corrosion-resistant finish Covers up to 110 sq ft or 2 coats on a standard bathtub Glossy, porcelain-like, waterproof finish Tough, hard protective coating acts like porcelain and ceramic Dries to the touch in 1 hour, allow surface to fully dry for 3 days prior to water exposure

Two-part epoxy acrylic formula withstands moisture and extreme hot temperatures Cleans up easily with mineral spirits This question is from 1-qt. White Tub and Tile Refinishing Kit7 Will one box be enough to refinish a pink tub? This question is from 1-qt. White Tub and Tile Refinishing Kit6 I have a blue tub. Will this work to change the color, as I want the tub white. I have a fiberglass tub and wall surround.
Outdoor Furniture Sale Restoration Hardware This question is from 1-qt. White Tub and Tile Refinishing Kit5 how many cans of glaze do i need
Disposable Digital Camera Prices i have a regular size soaking tub how many cans of glaze do i need
108 Band T Shirt This question is from 1-qt. White Tub and Tile Refinishing Kit4 Will this product work on a cast iron tub

Patterned cracking in the paint film resembling the scales of an alligator. Bubbles caused from a loss of adhesion and lifting of the paint film from the underlying surface. Undesirable adhesion between two painted surfaces or between paint and weather stripping. The splitting of a dry paint film through at least one coat. Loss of caulk’s initial adhesion and flexibility, causing painted caulk to crack and/or pull away. Caulk - Paint Cracking or Crawling The cracking of the paint film over a caulked area. Paint lifting from the underlying surface in the form of flakes. Deep, irregular cracks resembling dried mud in the dry paint film. Peeling - Concrete Floors Flaking and peeling of a coating applied to concrete flooring. Peeling - Due to Moisture (Inside) Loss of adhesion of the interior paint caused by high levels of moisture. Peeling - Due to Moisture (Outside) Loss of adhesion of exterior paint, usually exposing the bare surface.

Peeling - From Galvanized Metal Paint fails to adhere to galvanized metal. Peeling - Intercoat Peeling in Protected Areas Loss of adhesion of a coating under eaves, porches, or other protected areas. Loss of coating's adhesion to plaster surface in spots or larger areas. Peeling - Under Eaves Loss of adhesion of a coating applied to exterior protected areas (under eaves, porches, etc.). Peeling - Over Hard,Slick Surfaces Lack of adhesion of a coating, exposing the surface that was painted. Cracking - Plywood Checking Thin, long, and relatively straight cracks that form in the paint film, usually in the direction of the plywood grain. Cracking - Stained Rough-Strewn Siding Thin, long, relatively straight cracks running in a singular direction on a previously stained wood surface. Choose Color with Confidence Connect with Color on Facebook The paint in our tub has been developing air pockets under it for a while, and this morning a big chunk ripped off.

As far as I can see, the layer underneath is undamaged except for the stains. Might it make sense to strip off the rest of the paint and live with the stains until I have the time and money for a better repair? For those wondering how such a big chunk came off, last night I took off the non-slip mat which was suction-cupped to the tub and scrubbed the tub (non-abrasive cleaner, but rubbing pretty hard). This morning I stepped in for a shower, and the area where the mat had been detached. I'm not sure if there is a correct answer. Stripping off all the paint would be a job, especially where it may be well adhered. I think you would be well served to remove any loose areas as they develop until you are ready to do a complete refinish. When you do the refinish, then it will be necessary to strip all the paint and etch the original porcelain before proceeding.Browse other questions tagged paint bathtub or ask your own question.This past weekend, my whole family drove down here from PA to help us crank out the last of our major house projects.

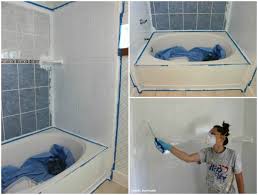
We had 6 extra set of hands working away for 3 days and we were able to get so much done. We are seriously blessed to have a family that would travel all the way here and devote so much of their time and energy to help us with our home. I think everyone was exhausted by the time we called it quits yesterday! Thanks to my family, now I have lots of projects to share with you! But before I do that, I need to play catch-up. Knowing they were coming motivated me to cross off a bunch of projects off of my growing to-do list – like actually finishing our never-ending bathroom renovation! After tiling the shower surround, the bathroom was in much more livable condition that we were able to take a little break to focus on other areas of the house that needed attention. But last week I finally made time for DIY bathtub refinishing and hung up the shower curtain I made (I’ll show you that next), so I’ll be able to do the official before & after bathroom breakdown! This was my first time using a tile & tub refinishing kit, so I’m certainly no expert on the matter, but I can show you what I did and what I learned.

We think the tub is our home’s original cast-iron piece. Structurally, it was in fine condition, so it made more sense for us to keep and refinish it than to replace it. For starters, we have no idea how we would even get it out of the bathroom. However, the finish was completely worn off so it was permanently stained, no matter what product I used or how hard I scrubbed it. The finish around the drain was rusted and chipped too. Our original plan was to hire a professional to reglaze it. The quote we got was $350, which is a very reasonable price for the long-lasting quality we’d get from a professional finish. But budget is the main factor in the renovation, so I figured that if I could do it on my own for much less, I should at least try. After reading a bunch of reviews on amazon, I bought Rustoleum’s Tile & Tub Refinishing Kit on sale for just $23.50. Actually, we were able to use credit card rewards to purchase it, so technically it was free! Here are the supplies I used:

First, you’ll need to remove the old drain and trip lever. Or have your husband do it Using a sponge with a scratchy pad, scrub the tub with a cleaning product that has a bleaching agent. Rinse thoroughly and repeat with a product like Lime-A-Way or CLR if needed, especially around the drain and trip lever. Sand the whole tub with 400-600 grit wet/dry sandpaper. Rinse it really well and wipe dry with towels. Then, you have to wait three hours to let it dry out even more. Before you’re ready to start painting, tape off the surrounding areas. I would tape down newspapers or a drop cloth over the floor too. I used newspaper on the floor but didn’t tape it down, and it shifted while I was painting and I got a streak of white tub enamel permanently stuck on my beautiful reclaimed wood floors I have an idea for how to fix it when I get the chance. The tub refinishing kit is pretty toxic to breathe, so I opened all the windows in the house, turned on the bathroom venting fan, pointed another fan in towards the bathroom, and wore my respirator.

I couldn’t smell a thing with the respirator, but throughout the rest of the house, you could still smell the chemicals even with all the precautions we took. So it wouldn’t be a bad idea to leave the house for a few hours until most of the scent dissipates. With the kit I used, you’ll mix the two cans separately, then pour the activator into the base and stir some more. Whatever you use to apply the enamel will be ruined, so plan to throw away your tools. Wear gloves and cut in with a small foam brush, then roll with a small foam roller. This is the part where I made some critical mistakes. I started applying the enamel the way I’m used to with standard latex or acrylic paint – with a very thin layers & feathering out the edges. But I quickly learned that was a baaaad idea. This paint is so thick and sticky and dried so quickly that it started to pull the foam right off the roller and then ripped the whole thing in half, and I was left with a ton of little pieces of foam stuck into the enamel.

I was panicking that I ruined the tub and shouting for Phil to help me, although there’s really nothing we could do at that point. Thankfully, after it dried I was able to lightly sand off the pieces of foam before I applied the second coat, and all was well. The second time around, I learned the tricks: – Roll the enamel on really thick, but without leaving harsh edges – Never let the roller become dry – If the roller starts to look damaged, replace it with a new one immediately – Apply as fast as you can! Here’s how mine looked after the second coat: You have to let it cure for 3 days before it can be exposed to water. Then remove your tape, reinstall your drain & trip lever, and enjoy! Even after the broken foam roller catastrophe, I thought the finish turned out great. It’s smooth, shiny, and bright white. We’ve only been using it for a week, but it seems to be holding up great. I’ll let you know how it wears as time goes on. We replaced the old drain and trip lever with new shiny ones to complete the makeover.