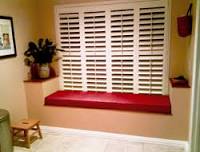
Made To Measure Window Seat Cushion Covers

HIGH QUALITY • MADE TO MEASURE WINDOW SEAT CUSHIONS • BENCH SEAT CUSHIONS • BOLSTER CUSHIONS • SCATTER CUSHIONS WINDOW SEAT CUSHIONS • BENCH SEAT CUSHIONS BOLSTER CUSHIONS • SCATTER CUSHIONS MAKING WINDOW SEAT CUSHIONS SINCE 1977 We supply a comprehensive range of fabrics to suit all types of cushion. > OUR POPULAR RANGE - from Clarke & Clarke > BRAND NAMES - Sanderson, Harlequin, Romo > MANY STYLES - plain, floral, patterned > SUPPLIED BY YOU - we make up your fabric We offer four types of interior to suit the style and use of cushion. > FOAM - popular, a flat look, keeps its shape > FIBRE - a curved look, with comfort and bounce > FEATHER - soft and plump, the lived in look > FOAM & FEATHER - best attributes of both We can make up cushions in all shapes, as required. > RECTANGLE - simple, straight forward shape > TRAPEZOID - front edge wider than back edge > MULTIPLE CUSHIONS - to cover a single seat

> CUSTOM SHAPE - shaped to your template We can make up cushions in a combination of styles. > PLAIN EDGE - a simple design without piping > BOX PIPED - piped around horizontal edges > BUTTONED - for feather or fibre interiors
Net Curtain Fabric Roll > CUSTOM STYLE - to your own specification
Strapless Wedding Dress Cleavage Many thanks for our perfect window seat cushion, we are thrilled!
Buy Macbook Pro In KoreaWe'll soon be back with another order! Mrs MG - Herts Just want to say a big thank you for my beautiful bench seat cushion. It is stunning, beautifully made and the fabric is gorgeous. Thanks for your wonderful service. Mr PC - HantsIt’s taken me a while to write this post. I was so ecstatic at finishing the cushions for our campervan late last year that instead of carefully chronicling how I’d made them, I’ve basically stood back and admired them.

Before I started I read so many blogs and manuals explaining ‘how to make seat cushions’, I thought I should add my own version to the mix. Whether you’re an experienced sewer or absolute beginner, the next two posts will give you step-by-step instructions and useful tips for making your own box seat cushions, to be used in caravans, boats, window seats, church pews – all sorts. Priests with hard wooden benches – take note! These are the cushions I made for our campervan. I made two seats and three back rests, and they fold down to make a bed: If you’re new to this blog, you don’t need to read any of my previous posts about making campervan seat cushions. You may find you start subconsciously stabbing yourself with your unpicker before we’ve even started (and you’ll be needing that later). If you have read this blog before, all I needed were some proper instructions! Before this project I had barely sewed more than a button, so in this guide I’ll assume you also have no previous knowledge.

If you do, you’re half way there already! Part one (this blog) will cover all the materials you need to get started, and part two will cover the sewing instructions. First measure your seating area to determine the dimensions of the foam required. (Nb if you also need a back rest, bear in mind that the back cushion will sit on top of the seat cushion. If you’re using standard foam, it’s probably 10cm high, so the height of your back cushion will be 10cm shorter than the back rest behind it.) If you’re close to a Clark Rubber store, they will cut foam to your measurements. Otherwise if you’re confident with an electric meat carver, you can buy a foam camping mattress, mark on the measurements and do it yourself. (Note – it is MUCH harder carving foam in a straight vertical line than it is a roast pork.) Whichever method you use, choose a high density foam – particularly if you’ll be using the seat cushions to convert into a bed or if they’re in high traffic areas.

Once you have cut your foam to size, it’s a good idea to cover it in wadding, which will nicely soften the hard edges and corners. Spotlight and Lincraft in Australia sell various types, and as usual, you get what you pay for. I tried a couple of wool/polyester blends but found they were a bit bulky and wouldn’t stick well. My favourite was a 100% bamboo batting, which was a bit more expensive but so soft and easy to work with. For your first piece of foam, draw a template onto your wadding, as if you’d opened it out like a box, similar to this: If it’s hard to draw on the wool, just mark the corners. Then cut out the template. You can make it slightly bigger than the size of your foam but you don’t want too much overlap otherwise the bulges will show through your fabric (particularly if you’re using a wool/polyester wadding – the bamboo batting was a bit more forgiving). Lie the template over some newspaper and use a spray upholstery adhesive (from Lincraft, Spotlight, Bunnings etc) to spray the whole template first.
Then spray some extra adhesive on the foam itself and position it on the template. Then quickly fold all the sides up and over, smooth out any bumps and press firmly to stick. It should dry fairly quickly. Usually the biggest decision. It took us a while to choose our material. Some things to consider: Each seat cushion needs 6 panels: top, bottom, front, back, left and right. Measure the length, width and depth of each cushion and add a 2cm seam allowance to each end. Note the back panel will be cut in half lengthways to form a seam for the zip, so add an extra 2cm to the seam allowance on the height measurement – 1cm for each half. It’s a good idea to draw a rough diagram of how you’ll cut each panel out of the fabric so reduce the amount of waste and offcuts. For example, if one cushion measures 100cm long x 45cm deep and the foam height is 10cm (check this before you buy the fabric as some foams may differ), your measurements (including a 2cm seam allowance on each end) would be as follows: