Outdoor Seat Cushion Filling

For the growing number of "DIY'ers" out there, Cushion Source offers cut fabric yardage, blocks of cushion filler, and pillow buns to help you complete your creative project. Make your own cushions or pillows with materials from Cushion Source. We can help with the necessary supplies. We offer cut yardage from the entire collection of Sunbrella fabrics, as well as designer acrylic fabrics, collegiate fabrics and more moderately priced fabrics suitable for indoor use, all reasonably priced per yard. We offer foam and layered polyester to fill your cushion shells, each cut to your specific dimensions and thickness. Our medium-density foam provides great support for indoor applications. If you are making your own cushions for outdoors, we suggest using our layered polyester filling. It does not retain water, and it is not susceptible to mold or mildew. Teamed with Sunbrella fabrics, this polyester filling will help you make cushions to cherish for seasons to come.In yesterday’s post, we outlined 4 Important Foam Terms to Know and how those attributes are important to different foam applications.

Now that you can talk about foam’s properties and features like a pro, it’s time to take a look at specific types of foam and which of those features they bring to the table. When choosing foam for your next outdoor project, be sure to consider your application and determine which properties are most important for the environment your cushion will live in. This is not actually foam, but rather densified polyester batting that creates an effective foam alternative. Compressed polyester will not disintegrate or yellow like traditional foam, but it will compress over time. An example of this is Nu-foam Compressed Polyester, which is mildew resistant and non-allergenic. Nu-foam is washable, and will easily air dry after getting wet. This foam alternative is an inexpensive option and is best used for occasional seating, like patio cushions. Like Compressed Polyester, Polyester Fiberfill is not truly foam, but rather blown polyester fibers. An affordable option, it is a common stuffing for pillows and deep seating back cushions.

Generally, Polyester Fiberfill is stuffed inside a pre-sewn cover of Spun Bonded Pillow Protector Fabric, which is then inserted into the cushion or pillow fabric to give support and shape. Fiberfill is non-allergenic, and resistant to mildew. It is machine washable, but the fiber can bunch up in laundering. Use your hand to smooth it back out. A more traditional foam option that often contains a biocide treatment, Polyurethane foam is affordable, has a medium firmness, and is suitable for seating and mattress applications.
Remove Bathtub And Put In ShowerIf polyurethane foam gets wet, the cells will soak up the water.
Moving Companies Houston To CalgaryThe biocide treatment is important because it prevents mold and mildew growth that can occur when wet foam dries out.
Vacuum Cleaner Mini Tool Kit
It is a good idea to use polyurethane foam in locations where it won’t get wet or to wrap the foam in plastic before inserting it into the fabric. Brands of polyurethane foam include Reflex and Sailrite’s Anti-Microbial Polyurethane Foam. Reflex foam is the most common marine cushion foam. An open cell reticulated foam has open pores that allow water and air to flow through easily. Open Cell foams make a comfortable and cool seating cushion or mattress. Dry Fast is a high quality open cell foam. Dry Fast foam is formulated with an antimicrobial agent to prevent mold and mildew. It is a more expensive foam, but you get what you pay for. When paired with an outdoor cushion fabric or Phifertex Mesh, open cell foam creates a virtually maintenance free cushion in sun, rain, and snow. Dry Fast is a popular, user-friendly open cell foam. Due to its popularity, there are knock-off versions on the market. To see if your foam is high quality Dry Fast foam, pour a cup of water on it.

The water should run straight through the foam and drain out the bottom. If the water runs off the sides of the foam, this is an imitation Dry Fast foam. Also known as floatation foam, Closed Cell foam does not allow water to run through, making it buoyant. This foam is made from PVN and is 3 times firmer than Polyurethane foam. It is also a more expensive option. Closed cell foam is great for flotation applications like floating cockpit cushions and life vests. It is also a good choice for commercial boat seating, or other seating that will be used as a step for getting on and off the vessel. This foam has no water absorption, so you can safely cover it with any type of fabric. Thin sheets of closed cell foam are often glued to the bottom of other foam, adding additional support for the cushion, like a box spring to a mattress. When used with Dry Fast Foam, cut holes in the closed cell foam for drainage. As you can see, there are a lot of foam options out there so it should be no problem to find one that is just right for your next project.

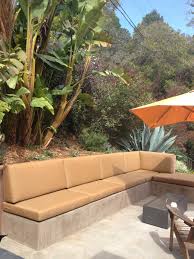
Check back tomorrow for the third and final installment in the foam series, Anatomy of an Outdoor Cushion, to see how to wrap and protect the foam inside the cushion. - Do It YourselfWe have a number of types of cushion filling foam to meet your needs. Choose from sofa foam that will stand up to heavy use, foam inserts, outdoor foam that holds up against the elements, and much more.By now you've probably seen the cozy little outdoor space that we created at our studio so we can soak up some good summertime vibes outdoors. Josh made amazing bench seating to give us a place to lounge, but it can be difficult to lounge properly on stiff wooden boards, so we decided to add some thick outdoor cushions to make our seating area more comfortable. Here's what I did: Supplies:-canvas twill or outdoor fabric (I bought our stripe fabric at a local fabric store)-outdoor cushion filling (like this)-standard sewing machine-zipper the width of your cushion-fabric scissors and sewing pins First I measured the width and depth of each seat to see how big the cushions should be.
The cushion filling I bought was 4" tall, so I knew that number would be the height of my cushion. To figure out the fabric dimensions for the cushion panels, take the width and depth measurements and add 1" to both numbers to allow for a 1/2" seam allowance all around. These measurements are for the top and bottom panels of the cushion. To determine the side panel length, add the original measurements (the numbers before the additional inches for seam allowance) of all four sides of the large panel together. Add 1" onto that big number to allow for a 1/2" seam allowance. The height of your super-long side panel is the height of the cushion filling with 1" added for a 1/2" seam allowance. Take these dimensions and cut your top and bottom panel and your long side panel accordingly. Use fabric scissors to round the edge of your fabric corners on your two larger panels. To connect your long side panel strip and make one big continuous loop around the edge of your cushion, fold the panel in half (with the right sides facing each other), and sew 1/2" from the edge to connect the ends.

Line up the edges of your side panel loop of fabric with the edge of the top panel (with the right sides together), and pin the edge in place. To make the corners easier to sew, add some "V"-shaped notches around each corner. Use your machine to sew all the way around the edges with a 1/2" seam allowance. Pin the bottom panel to the side panel in the same manner as the top panel, and make notches on all the corners. Before you sew all the way around the bottom panel, you'll want to add a zipper at one of the ends so you can insert your cushion filling. Place the zipper face down onto the right side of the fabric at one of the ends of your bottom panel. Pin the zipper in place so that the zipper will be installed 1/2" from the edge. Use a zipper foot on your machine to sew the right side of the zipper in place. Repeat the process of pinning and sewing the other side of the zipper so that you have a functional zipper installed. Now you can sew all the way around the rest of the bottom panel (starting at the end of the zipper and stopping when you reach the beginning of it).

Make sure to leave your zipper open a few inches before you sew all the way around so you can get back in later! Flip your cushion cover right side out, and you're ready to add the filling!Use a ruler and a marker to measure the appropriate width of your cushion filling.* If you aren't able to buy a cushion long enough that's in one piece, you just use as many pieces as needed to fill the cushion length. *NOTE: I would highly suggest making the width and length of the insert a little bigger than your actual cover dimensions (maybe add an inch to both). This way the insert will fit snugly into the cover and you will have a full-looking cushion.Now, I've heard that some people use jigsaws or even electric turkey carving knives to cut foam and filling, but the thing that worked the best for me was actually a plain old handsaw. The saw was able to do most of the cutting pretty easily, but I did use some fabric scissors to clean up the edge a bit. Once my filling was cut to size, we folded the filling in half like a taco shell and inserted it into the cushion cover through the zipper opening.