Replace Toilet Tank Handle

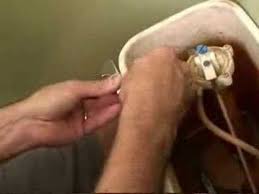
Edit ArticleHow to Replace a Toilet Handle Two Methods:Removing the Old HandleInstalling the New HandleCommunity Q&A The handle on a toilet is an important component to any bathroom design. Not only is it integral to the function of the toilet, but the style and finish of the handle should also coordinate with the rest of the bathroom faucets and fixtures. If your toilet handle is corroded or out of date, replace it with a new one to keep your bathroom functioning in style. Before the new handle can be installed, the old handle needs to be removed from the tank properly. Shut off the water valve to the toilet and flush the toilet to drain any water from the tank. Remove the lid from the toilet tank. Unscrew the wing nut that holds the tank lever to the back of the handle. Unscrew the nut from the back of the handle. Toilet nuts thread in reverse; turn the nut clockwise to remove it. If the nut is plastic, use your fingers to loosen it. If the nut is metal, use a wrench to help loosen it.

Pull the handle through to the front of the tank and remove the nut and washer from the back of the toilet tank. Toilet handles install similarly to the way the old ones are removed. Unscrew the washer and nut from the back of the new handle. Push the new handle's stem through the hole on the side of the toilet tank. Slide the washer over the handle's stem and screw the nut back into place. Lift up the toilet lever and push its end down through the hole at the end of the handle's stem. Screw on the wing nut to the end of the toilet lever to hold it in place. Turn on the water valve to refill the toilet tank. Flush the toilet to make sure the new handle works. Replace the tank lid. Toilet handles come in left and right hand versions, as well as front and side tank versions. If in doubt, take your old handle with you to the store to purchase a new one to ensure the new handle fits the tank properly. Do not over tighten the nut against the toilet tank.
This may result in the porcelain of the tank cracking under pressure. Only tighten the nut enough to hold the handle securely in place without the handle jiggling when the toilet is flushed. Tank Lever with White Plastic Handle and Brass Arm Everbilt Anti-Bacterial Chrome-Plated Tank Lever Wellworth Trip Lever in Polished Chrome Everbilt Fit-All Chrome Plated Tank Lever Everbilt Fit-All Plastic Tank Lever in White Optima EBV89AM Battery Powered Closet Valve in Polish Chrome Everbilt Eljer Side Mount Tank Lever Everbilt Toilet Tank Lever in Chrome Everbilt 28 Degree Toilet Tank Lever in Chrome Everbilt Brass Tank Lever with Rubber Oil Handle Porter Toilet Tank Lever in Oil Rubbed Bronze Everbilt Anti-Bacterial White Plastic Handle Tank Lever Premium Tank Lever and Arm Universal Fit in Brushed Nickel Brantford Tank Lever in Oil Rubbed Bronze Premium Tank Lever and Arm Universal Fit in Chrome Push Button in Chrome for Dual-Flush Toilets

Banbury Tank Lever in Mediterranean Bronze
Concrete Bathtub Price Everbilt Toilet Tank Lever in Polish Brass
Patio Furniture Stores In Irvine Ca Classic Premium Tank Lever and Arm Brushed Nickel
Curtains Simons Classic Premium Tank Lever and Arm Chrome Flush Valve Actuator for American StandardKeep your toilet flushing smoothly by installing a universal toilet lever. Good plumbing is a key element in a home and sufficient flushing will help keep toilets and bathrooms clean. An old toilet tank lever could be worn out from years of use and cause flushing problems. Replacing it with a universal tank lever will cut down on costs and provide a durable solution for several years. Even without plumbing experience, you can complete this simple installation on any toilet in your home.
Turn off the water valve behind the toilet. It is commonly located to the left of the toilet. Turn it clockwise until it tightly shuts off and no water enters the toilet tank. Lift the cover off the toilet tank and set it aside. Pull up on the toilet chain and drain all of the water. Disconnect the chain clip from the toilet lever. Set the chain on the bottom of the toilet tank. Loosen the nut connecting the lever to the tank with a wrench. Once it is loosened, use your hand to spin the nut free. Slide it off the lever and discard it. Pull the lever free from the connected flush handle. As you pull the lever out, turn it slightly so it smoothly comes out of the hole. Slide the new toilet lever into the hole and follow the natural curve of the lever as it goes in. Slide the plastic nut down the end of the lever to the edge of the tank. Rotate it clockwise to tighten it against the tank and the flush handle. Use a wrench to might it extra tight. Clip on the chain to the end of the lever.

If the chain appears too loose, move it to a farther hole so the toilet flushes properly. Turn the water back on. Test the toilet and make sure it flushes properly. Things You Will Need Wrench References YouTube: Plumbing - Replace Toilet Tank Lever Video Photo Credits Jupiterimages/Polka Dot/Getty Images Suggest a CorrectionQ. "How do I change my toilet trip lever?" A. Changing a toilet trip lever is a very simple DIY project that almost anyone can complete. Check out our short video below to learn how to change your flush lever. View video tutorialHow To Replace a Toilet Trip Lever Q. "What are the most commonly replaced toilet parts?" A. This depends on several factors; each time you use your toilet the trip lever, flapper, and fill valve are operated. You will find, however, that the flapper and fill valve are the parts most exposed to water and will be the first ones to wear out in most cases. Q. "What is the difference between "OEM" and "will-fit" parts? And what does OEM mean anyway?"

A. "OEM stands for "Original Equipment Manufacturer". This means anything from the original manufacturer that is sold to a second company to use in production of that second company's product. In other words, many toilet manufacturers outsource for the internal working parts of the toilet, such as the fill valves, flush valves, or flappers. When this happens, they have the opportunity to use an existing part, or to spec something for the specific toilet. When the toilet manufacturer chooses to use an existing part, the manufacturer of the part can still sell that piece under their own name. If the toilet manufacturer chooses to spec something for the specific toilet, the part manufacturer can then only provide that part to the toilet manufacturer. What this means for you is that you can sometimes get the *exact same part* (by the original manufacturer of the OEM part), but under another name and at a better cost! So when your toilet's internal working parts need to be replaced, you may have the option to use either the "OEM" part number or use the "will-fit" part number to order what you need.

Please note that only some "will-fit" items are manufactured by the OEM manufacturer. If this is essential to your repair, please feel free to contact us and we will be happy to check for you. Q. "How do I tell what type of toilet trip lever I have?" A. To determine what type of trip lever you have, you will need to note where the trip lever is mounted on the outside, then open the toilet tank and see how it is mounted, and how it is angled towards the flush valve. Once you have determined how your trip lever is installed in relation to the tank and flush valve, you should be able to select a trip lever from our extensive offerings. Q. "How do I tell what type of mount my trip lever is?" A. There are several ways trip levers are mounted; the style will depend on the manufacturer's shape of the tank, and the location of the flush valve. The styles are angle mount, side mount, front mount, right-hand mount, and offset. The angle mount typically has a 45° angle in the arm so that it can reach the flush valve located near the center of the tank.

The side mount trip lever is for toilets that need a trip lever on the left side of the toilet tank (when standing and facing the toilet). Front mount toilets are one of the more common styles, and are mounted on the left/front of the tank (unless it is noted as "right hand mount"). Right hand mount is located on the right/front side of the tank. The offset trip lever has a long arm, and is angled to work around a less commonly angled tank shape. Q. "What are the trip levers made of?" A. Some trip levers have a metal handle and brass arm; however, as more and more homeowners opt to replace parts themselves, plastic replacement trip levers have become more readily available as a less expensive alternative. The metal trip levers are of superior quality when compared to plastic, and will far outlast them. Unfortunately, plastic trip levers are more likely to deteriorate than the all metal ones, making replacement more likely, more often. A real value in an all-metal trip lever would be the front left mount brass tank lever.