Vinyl Flooring On Staircase

River Stone 47 in. Long x 12-1/8 in. Deep x 1-11/16 in. Height Vinyl to Cover Stairs 1 in. Old Nutmeg Hickory 47 in. Length x 12-1/8 in. Deep x 2-3/16 in. Height Vinyl to Cover Stairs 1-1/8 in. to 1-3/4 in.Long x 1/2 in. Deep x 7-3/8 in. Height Vinyl Riser to be Used with Cap A Tread Durban Oak 47 in. Vintage Oak Cinnamon 47 in. Rustic Maple 47 in. Height Vinyl Right Return to Cover Stairs 1 in. Oak Amber 47 in. Rustic Maple Honeytone 47 in. Height Vinyl Overlay to Cover Stairs 1-1/8 in. to 1-3/4 in. Sawcut Dakota 47 in. Country Pine 47 in. Canadian Hewn Oak 47 in. L x 12-1/8 in. D x 2-3/16 in. Red Cherry 47 in. Height Vinyl Overlay to Cover Stairs 1 in. Aspen Oak Black 47 in. Sawcut Colorado 47 in. Pacific Pine 47 in. Markum Oak Medium 47 in. Length x 1/2 in. Height Laminate Riser to be Used with Cap A Tread Cayman Ash 94 in. Vinyl stairs are an alternative to carpet or hardwood. Vinyl flooring is a popular flooring material due to its affordability and the ease of installation, which makes it ideal for the DIY generation.

While not as durable as ceramic tile and natural stone installations, it can nevertheless stand up to foot traffic and is far easier to clean than carpet. While it is more common in floor settings, it can also be used on stairs. Sheet, Planks and Tiles Part of the planning process for a stair installation is the type of material you are going to use, and with vinyl you have the choice to go with tiles, sheet vinyl or vinyl planks. Sheet vinyl is rarely used in a stair setting, but it is an option. The most common are vinyl tiles because they are the quickest to install and can simply be laid in place on top of glue, while planks require more labor since they have tongue-and-groove systems that are similar to hardwood floors. Layout Regardless of which type of vinyl you are using, layout is the single most important element in the overall installation. Without proper layout your vinyl installation may run out of square or have ugly sliver cuts on one side or the other. Centering the stairs vertically is a common method so you have the same size cuts on either side of the stairs, but it’s also important to center the treads.

For example, if you have a 14-inch-deep tread but you have 12-inch tiles, there will be an unsightly sliver cut at the back of the tread unless you split the difference and use two same-size cuts to span the tread. Tools How you cut vinyl flooring depends on the type you’ve chosen.
Led Lamps For Indoor PlantsTiles require a special cutting tool that snaps the tiles along a blade, while vinyl planks usually need to be cut with an electrical compound miter saw.
Where To Buy Fishing Reel HandlesSheet vinyl can be cut with a sharp utility knife, although you need to use a straightedge to help guide your blade when making cuts so you can keep everything straight.
Queen Size Quilt Cover DimensionInstallation Sheet vinyl and tiles are glued down with a mastic adhesive that is troweled onto the surface of the stairs before application of the vinyl.

The flooring is then pressed into place by hand or with a weighted roller to press the vinyl into the glue. Planks, on the other hand, can be glued down or nailed in place, depending on the manufacturer's instructions. In all cases, glued installations must be given sufficient drying time according to the brand of glue used before foot traffic is allowed. Photo Credits David Sacks/Lifesize/Getty Images Suggest a CorrectionExplore Stairs Lvt, Tile On Stairs, and more!Vinyl Wood PlanksWood PlanksPlanksStairsVinylsLuxuryWoodsFloorsPeople are happiest when they feel safe. Especially those that rush from one level to the next, sometimes two stairs at a time. While often overlooked, proper stairwell design is critical in balancing safety with performance, and goes a long way toward realizing a long-term return. According to a major liability insurance provider, slip/fall accidents account for 21 percent of the direct cost of disabling workplace injuries. That's about $8 billion a year. And $3.5 billion of that is a result of falls to lower levels.

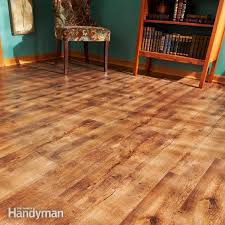
Add in the costs of lost productivity, increased administrative time and legal fees. Plus just try to put a figure on the pain and suffering of the people. Proper stairwell management in commercial flooring can help minimize this risk while maximizing performance. Rather than interrupt the flow of a space, our rubber and vinyl stairwell solutions enhance them. Every component is designed to work with all other elements in the space within rubber or vinyl flooring. Allowing people to move safely and comfortably through the ups and downs of their day. For added safety, ensure that all treads include contrasting strips that aid the visually impaired.But it turns out that there was nothing to worry about. I was able to install 150 sq. ft. in less than a day without any problems. It was the fastest, easiest floor I’ve ever installed. And the next time we need new flooring, my vote will be for luxury vinyl. This article will walk you through the process I followed and show you some key tips along the way.

I’ve installed just about every type of flooring the world has ever known. So when my wife chose luxury vinyl planks (LVP) for the new dining room floor, my first thought was: Why couldn’t she pick something I already know how to do? Now I’ll have to muddle through the installation of an unfamiliar product, hoping to avoid costly mistakes along the way.LVP starts at about a couple of dollars per sq. ft., similar in price to medium-grade laminate. It’s available at flooring stores and home centers. LV flooring is similar to sheet vinyl, but it’s thicker, tougher and easier to install. It comes in tiles and planks, but this article covers planks only. I used a product called Adura LockSolid. It’s a floating floor which means it isn’t fastened to the subfloor—it just lies there. Luxury vinyl is the fastest growing category in the flooring industry. LVP flooring can be installed over most surfaces as long as those surfaces are smooth. Rough and uneven spots will telegraph through the new flooring, causing noticeable high spots that will wear faster than the rest of the floor.
Concrete subfloors must be at least six weeks old, dry and free of powder and flaking. Large cracks and expansion joints should be filled and troweled smooth. Home centers sell mixable and premixed products that work on most surfaces. Find the high and low spots on wood subfloors with a straightedge. The floor height should not rise or drop more than 1/8 in. over the span of 4 ft. Sand down the high spots with a belt sander equipped with a coarse-grit belt (Photo1). This is a dusty job, so turn off your furnace to avoid spreading dust all over the house, and wear a dust mask. Fill the low spots in the plywood with floor patch (Photo 2). Avoid self-leveling floor patch. The floor doesn’t have to be level; it just has to be smooth. Some older houses would require a cement truck full of self-leveling floor patch to do the job. Check your installation manual about any other subfloor specifics. Begin and end with half a plank or more. If you lay the planks perpendicular to the longest wall, you’ll end up making fewer cuts.