How To Remove Chipped Paint From Bathtub
In a humid bathroom, paint can easily start to peel if it wasn't applied properly. With its high humidity and possibility of water leaks, peeling paint is a common problem for bathroom walls and ceilings. It's not only an eyesore in an otherwise attractive bathroom either -- it's a prime breeding ground for mildew and bacteria. Repairing peeling paint on your bathroom walls and ceiling can be a time-consuming process, but it isn't difficult. It's important to work carefully, though, if you don't want your paint to peel again. If your home was built before 1979, it may contain lead-based paint, so you're better off hiring a professional to handle the repairs if that's the case. Remove Chipped Paint The first step in repairing your bathroom walls and ceiling is removing the chipped spots. A putty knife or paint scraper works well at removing the paint if you carefully move it along the loose edges. Make sure to remove all peeling or flaking areas until the wall and ceiling only have firmly adhered paint on them.

Keep a trash can or other receptacle on hand so you can catch the loose paint chips as they fall and line the floor with a dropcloth in case you miss any flakes.
Heat Pump Air PurifierBecause small flakes of paint may fly through the air, wear protective eye wear and a dust mask as you work to avoid getting paint chips in your eyes or inhaling particles.
Prom Dress Outlet Stores MnPatch Once the chipped paint is gone, the surface will be uneven since some areas will have a layer or more of paint and others won't.
Repair Leaking Tub Shower FaucetTo create a smooth surface for repainting, use patching compound to even out the walls and ceiling. Opt for a quick-setting patching compound and apply it in a thin, even layer with a putty or broad knife.

When the first coat is dry, you can apply a second layer if necessary. Finish with a layer of all-purpose drywall compound and allow it to dry overnight. Sand After the patched areas are dry, you should sand them to ensure that there are no ridges or uneven edges. On the walls, you can sand by hand with sandpaper. Sandpaper can also work on the ceiling, but it will probably create a great deal of messy dust. Instead, try using a shop vacuum outfitted with a dust collection bag and a sanding attachment. The vac will collect all of the dust as you sand, so there's no mess to clean up afterward. But you should still wear goggles and a dust mask while sanding to protect your eyes and lungs. Prime Your bathroom walls and ceiling probably started peeling in the first place because they weren't properly primed. To avoid the same problem in the future, use an oil-based primer with stain-blocking properties before painting. The primer helps prevent water marks on the walls and ceiling and keeps the patching compound from getting wet and causing the paint to peel due to the humid conditions in the bathroom.

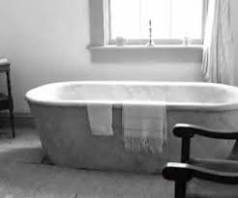
It also helps with prevent mildew growth. Repaint Once your primer is dry, you can repaint your bathroom walls and ceiling in any color you choose. But it's important to choose the right type of paint if you want to prevent peeling and flaking in the future. Look for a formula marked specifically for use in bathrooms. This type of paint has a high-gloss or semigloss finish and is washable. It also doesn't absorb moisture as readily as other types of paint, so it stands up to humidity well. If you're worried about stains, opt for a paint designed to resist mildew. References Painting and Decorating Concourse: How to Repair Peeling Ceiling PaintHome Depot: Patching Peeling PaintThe Family Handyman: Painting, How to Choose and Use PrimersHome Depot: Interior Paints, Selecting a Sheen Photo Credits Jupiterimages/Creatas/Getty Images Suggest a CorrectionPorcelain bathtubs can be restored using enamel paint. Bathroom renovations can run into tens of thousands of dollars depending on the age and size of your bathroom, and how many changes you wish to make.

There are small changes you can make to this important room in your house to update and improve its look. One place to start is the bathtub. Tubs are built to last, as installing a new one is a difficult task. Chipped paint on the porcelain or enamel surface can lead to rust or damage to the rest of the finish. A simple paint job can strengthen the surface and give the tub a new look. Empty your bathtub of any washcloths, soap bottles or other personal care items, and remove the shower curtain and liner. If you have a permanent bath door enclosure, remove the doors. The tracks can remain. Wash the tub with hot water and baking soda or a bleach-based detergent. Apply baking soda to the tub with a wet rag or sponge. Spray bleach-based cleaners directly on the tub walls and floor. Clean the walls and floor as best as you can, scrubbing any stubborn spots. Rinse the tub thoroughly with hot water, then dry completely. Use old or cheap bath towels so that any residual bleach does not damage your good linens.
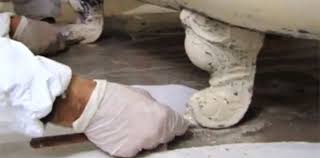
Sand the surface of the tub with a coarse-grit sandpaper so the surface is smooth. Pay particular attention to gritty spots, chips and rust. Apply painter's tape to the edges of any metal plumbing fixtures attached to the tub, including the fixture's handles and downspout, the overflow and the drain. If you are concerned about getting paint on the overflow or drain, cut a piece of wax paper to size and tape to the fixture with painter's tape. If the plumbing fixture's handles or downspout are in the way, cover them with a plastic grocery store bag, or small sandwich-size plastic bags if they are all separate pieces, and seal the bags to the end of the fixture with painter's tape. Wipe the entire tub down with a clean rag and paint thinner to remove any soap residue or grit from the sanding. Dip the end of a 1-inch by 50-millimeter brush into the paint and apply even strokes to the floor of the tub. Work from the tub floor, moving up the sides and then finally to the rim of the tub. Let the tub dry 24 hours.